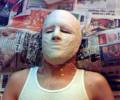
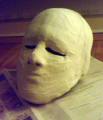
I’m building a polar bear costume for a childrens’ hospital here, and for the head, needed a life cast of someone’s face to build on. Back in Portland, I have several life casts of different people that I sculpt on when I’m making a mask. Wigforms are lovely things for wigs, but they are not proportioned like people, so masks tend to not line up.
Since I’m in Iceland, I recruited my charming spouse to go through the life mask process. This is a very simple plaster bandage life-mask, it’s good for mask making, but does not have enough fidelity for prosthetics; for those, you would use alginate. But for almost everything else, plaster bandages are plenty good.
- Prep all the supplies and have everything on hand. You should not leave the casting area once you start.
- You’ll need about three rolls of bandage, cut into strips about eight inches long.
- A bowl of cool water. Plaster heats as it sets, if you use warm water you can burn your subject.
- Scissors
- Music or some amusing anecdotes to keep your subject relaxed.
- Plastic wrap
- Vaseline
- Babywipes or makeup removal wipes.
- Sharpie or other permanent marker
- We start off by saran wrapping the back of his head to protect his hair and ears. I’m sorry that it didn’t occur to me to take photos while we were in this process.
- Vaseline the face thoroughly. There are other options for mold releases, but I’m kind of old-school. You can also use soap, which cleans up easier, but I always worry about it getting in the subject’s eyes. Pay particular attention to the eyebrows, putting enough on to smooth them out and mat them down. When you are finished covering the face, you want the vaseline to be smooth, without any obvious presence besides a glossy sheen.
- Have the subject recline. In a beautiful world, you’ll have something like a dentist’s chair so that they don’t have to lie all the way down. Gravity will change the shape of the face. Fortunately, since we aren’t doing prosthetics it’s not a big deal. I had Rob lie down on the floor with a bolster under his neck. Newspaper is everywhere to catch the drips.
- Dip bandage in water and start with the forehead, smoothing the bandage so that you can’t see the texture of the guaze. It is important to talk to your subject and tell them what is happening the entire time. Many people can freak out as their face gets covered in plaster.
- Work around the perimeter of the face, covering the eyes last. I do not put plaster over the eyelashes. I slide the bandage under the lashes and stop on the lid above them. After I pull the mask off, I will bandage over those areas.
- It will take about ten minutes for the plaster to set. During this time, offer to read to the subject, tell him stories or let him nap. Ideally you will have worked this out ahead of time. I use hand signals, thumbs up or thumbs down to indicate preferences.
- While the plaster is setting, draw a line on the saran wrap around the edge of the plaster , so you can see where to place the plaster for the other half of the mold. I don’t do both halves at the same time, because it is more comfortable for the subject to only have half his head encased in plaster.
- When the plaster heats up and then cools back down again it is ready to remove. Ask your subject to sit. Grasp the plaster at the edges and ease it off. Sometimes there’s a vacuum effect and you’ll feel a little resistance. It usually comes off smoothly.
- Next ask your victim to turn around so you can plaster the back of their head. Note: You only have to do this if you need a full head. For most mask work you can just cast the face. This goes just the same as above.
- You now have two halves of a head.
Congratulations. - Remove the saran wrap from your subjects head, and offer them the baby wipes to remove the vaseline.
- Join the two halves of the head with more of the plaster guaze.
- Seal the holes in the head with additional bandages
- Vaseline the inside thoroughly. I mean it.
- Mix plaster following the package directions and pour the plaster into your mold.
- Once it has set, cut the bandages around the original seam and remove.
- Ta-da! You now have a plaster duplicate of your subjects head.


OMG, your life mask is creepy.
Ha! I have to tell you that it amuses me very much that the system assigned you Jane Austen as your avatar. Maybe I should write some Regency Romance SF horror for you…
It amuses me, too. How can you take my jibes serious when they’re coming from Jane Austen?
Well, you know that if Jane Austen were jibing blatantly, that she would dead earnest.
You can change it, you know.
Pingback: PuppetBuilding.com » Blog Archive » Building A Bear