|
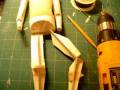 After I built the legs and checked for sizing, I added a small aluminum bar across the top, using the cloth and Zap method that I’ve mentioned before. This is so that the string I’m going to use to tie them to the torso doesn’t rip through the top of the leg. I drilled two small holes at the top of each leg and marked the hips where I plan to drill corresponding holes. After I built the legs and checked for sizing, I added a small aluminum bar across the top, using the cloth and Zap method that I’ve mentioned before. This is so that the string I’m going to use to tie them to the torso doesn’t rip through the top of the leg. I drilled two small holes at the top of each leg and marked the hips where I plan to drill corresponding holes.
|
|
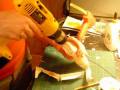 The paper itself would be easy enough to poke through with a nail, but the cloth and Zap strengthens it enough that using the drill gives me a little more control. The paper itself would be easy enough to poke through with a nail, but the cloth and Zap strengthens it enough that using the drill gives me a little more control.
|
|
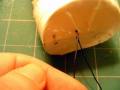 On a larger puppet I would make sure there was easy access to the inside of the hips, so that threading the legs in place would be easier. Nothing is quite as bad as having a leg drop off in performance and then face a scramble to retie it with limited access. An access hatch makes that whole experience easier, but Coraline won’t see performance so the string tying her legs on is unlikely to fray away from friction. That and she’s so small that an access hatch would be correspondingly tiny and close to useless. On a larger puppet I would make sure there was easy access to the inside of the hips, so that threading the legs in place would be easier. Nothing is quite as bad as having a leg drop off in performance and then face a scramble to retie it with limited access. An access hatch makes that whole experience easier, but Coraline won’t see performance so the string tying her legs on is unlikely to fray away from friction. That and she’s so small that an access hatch would be correspondingly tiny and close to useless.
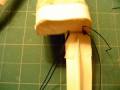
Instead, I use a piece of very fine steel wire, looped, to draw the string through. It’s well-nigh unto invisible, even in real life.
|
|
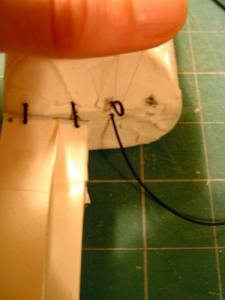 See how I pull that through? I told you the wire was well-nigh unto invisible. See how I pull that through? I told you the wire was well-nigh unto invisible.
The string I’m using, by the way, is Braided Dacron, 30 lb. test, which is designed for deep sea fishing. Puppeteers love it for marionettes because it resists tangling, is very strong, very thin and black. Monofilament tangles, stretches and catches the light on stage. A black thread is more likely to disappear for the audience.
|
|
 Ta-da! An attached leg. Ta-da! An attached leg.
|
I’m going to spare you the joys of making her feet or skinning her legs, since that would only cover techniques you already have seen. Tune in Monday to see her costume.


